2017 Cookie Con Classes

Cookiecon 2017! My first time attending was the prior Cookiecon and now I’m hooked! I’ll be attending in March 8-11, 2017 again as a Pre-CookieCon instructor and as a vendor. If you are interested in taking any of my classes, class registration is completed here and through paypal, and not through CookieCon. Registration now open.


Elegant Cookies with Fondant

Fondant is a very versatile decorating media! In this hands on class, we’ll explore some of my favorite techniques to create elegant cookies. We’ll use various tools and molds to create lovely textures and designs. We’ll cover some lace effects such as brush embroidery, plaques, and ruffles. Finally, we’ll create an adorable mini cookie bouquet. A little scared of fondant taste? We’ll be sampling, and the results are delicious! All of the supplies are included. You’ll complete at least a half dozen decorated cookies. $110,  limited to 15 students. 

Wednesday March 8; 8:00 am-12:00 pm

fondant

Modern Metallic Easter Egg Cookies-FULL- ADD TO WAIT LIST AVAILABLE

In this hands-on class we will be using lots of different media to achieve shimmer and sparkle. Learn what is edible and what is not edible for use on cookies. Then put these edible shimmers to use while we decorate some fabulous Easter egg cookies using rolled fondant, frosting sheets, and royal icing. We’ll be using metallic and pearl sprays, dusts, paint, and more. All of the supplies are included. You’ll complete at least a half dozen decorated cookies. $110,  limited to 15 students. 

Wednesday March 8; 2:00 pm-6:00 pm

modern-metallic


Buttercream Cookies! FULL- ADD TO WAIT LIST AVAILABLE

Learn how to decorate using buttercream. Pipe fabulous cookie that taste amazing! We’ll be piping ruffles, flowers, and much more. All of the supplies are included. You’ll complete at least a half dozen decorated cookies. $110,  limited to 15 students. 

Thursday March 9; 8:00 am-12:00 pm

buttercream

How To Register:  To register, fill out the form below. Class spots are held in the order the forms are received.  Once the form is received, I will hold your spot and I will send you a paypal invoice. In order to reserve your spot in the class, you will have 24 hours to make your payment. Please note: Registering for my class does not get you a ticket into CookieCon. CookieCon tickets are sold separately. Class registration is on a first come, first serve basis. However; CookieCon attendees receive priority. For more information on CookieCon, visit http://www.cookiecon.net/index.php

Cancellation Policy: Please cancel before February 1, 2017 to be issued a $100 refund (a $10.00 service fee is deducted as paypal charges me for every transaction). No refunds will be issued after February 1, 2017. In the unlikely event there is an emergency and I need to cancel, a full refund will be issued.

Do you have a question, or would you like more information? Email me at autumncarpenter@hotmail.com. Please do not request to sign up for the classes through this email. Use the form above.
Cookie Con Classes

I’m super excited to be attending CookieCon in Salt Lake City, Utah this year! I’ve heard so many fantastic things about this event, so I’m thrilled to be a part and to meet some fantastic decorators and students! I’ll be attending as a Pre-CookieCon instructor and as a vendor. If you are interested in taking any of my classes, class registration is completed here and through paypal, and not through CookieCon. For more information on CookieCon, visit http://www.cookiecon.net/index.php

Animal Cookies with Fondant, Wednesday, September 23, 8 am-12 pm

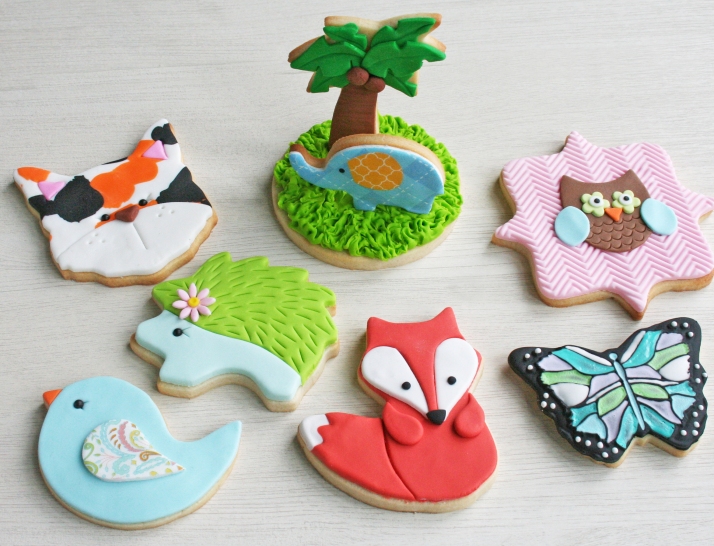
Fondant isn’t just for cakes. To be honest, I don’t love the taste/texture of fondant on cakes; but on cookies, it is a delightful sweet compliment, as well as a very practical decorating method! In this hands-on class we’ll start by tasting cookies using several different brands of fondant (and candy clay). Next, we’ll use various tools and techniques for fun textures, sculpting techniques, and edible frosting sheets. Finally we’ll create fondant pieces to create adorable accents. All of the supplies are included. You’ll complete at least a half dozen decorated cookies and a mini cookie scene.
$110,  limited to 12 students

IMG_0514

A sampling of what will be made in Animal Cookies with Fondant


All that Glitters,   Wednesday, September 23, 2 pm-6 pm
In this hands-on class we will be using lots of different media to achieve shimmer and sparkle. Learn what is edible and what is not edible for use on cookies. Then put these edible shimmers to use while we decorate some fabulous cookies using buttercream, rolled fondant, wafer paper, and royal icing. We’ll be using metallic and pearl sprays, dusts, paint, and more. All of the supplies are included. You’ll complete at least a half dozen decorated cookies.

$110,  limited to 12 students. FILLED. If you are interesting in being on the wait list in case of a cancellation, please fill out the form below.


Elegant Cookies with Fondant, Thursday, September 24, 8 am-12 pm

Fondant is a very versatile decorating media! In this hands on class, we’ll explore some of my favorite techniques to create elegant cookies. We’ll use various tools and molds to create lovely textures and designs. We’ll cover some lace effects such as brush embroidery, eyelet lace, and ruffles. Finally, we’ll create an adorable mini cookie bouquet. All of the supplies are included. You’ll complete at least a half dozen decorated cookies. We’ll also be tasting different brands and types of fondants and edible clays to determine your favorite!
$110,  limited to 12 students. FILLED. If you are interesting in being on the wait list in case of a cancellation, please fill out the form below.

IMG_0519

A sampling of what will be made in Elegant Cookies with Fondant


Do you have a question, or would you like more information? Email me at autumncarpenter@hotmail.com.  Please do not request to sign up for the classes through this email. Use the form above.

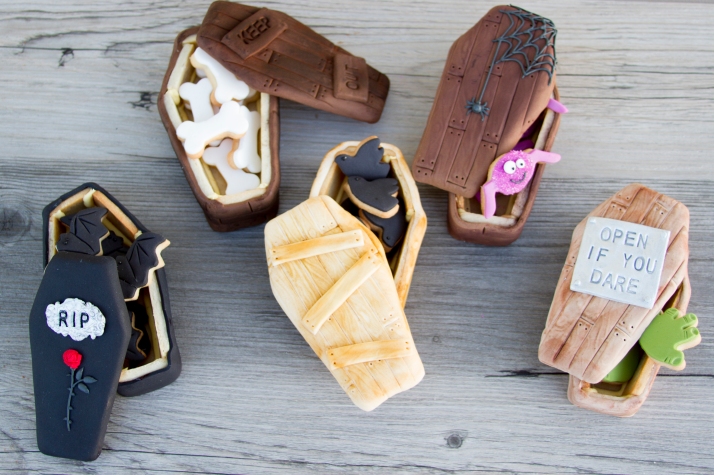
3-D Coffin Cookies filled with mini Halloween Cookies

IMG_7990

IMG_7998

Supplies used:

3-D coffin cookie cutter

Halloween mini cutter set
mini dog bone cutter
mini hand cutter
mini dove cutter
royal icing
black rolled fondant
brown rolled fondant
ivory rolled fondant
white rolled fondant
snap together letter embossers
chocolate brown dusting powder
deep brown dusting powder
wood grain texture mat
polyblade
two-in-one tool
brush
black non-pariels
piping gel
silver dusting powder
key silicone mold
rose mold
tip #1.5
paring knife
grain alcohol

Instructions:

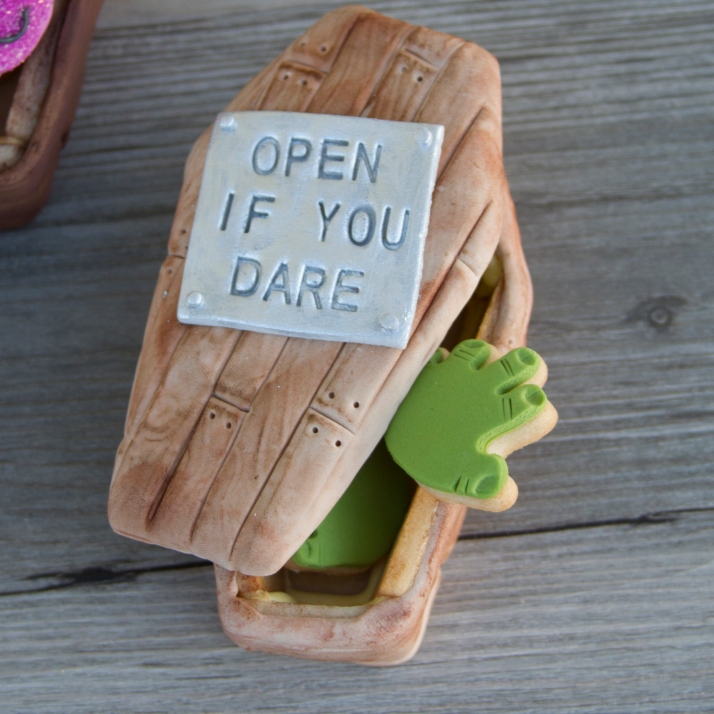
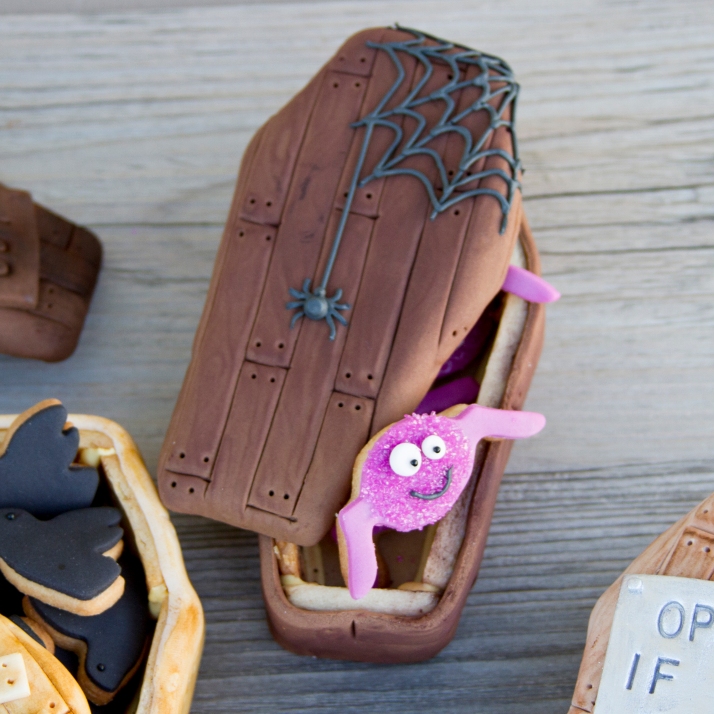
Roll cookie dough. Cut the coffin cookies, using the coffin cutter. You will need two sets from the cutter. Cut the bones, ghost, hands, crows, and bats. Bake and cool the cookies. Assemble the coffins using royal icing. Allow the 3-D coffin to dry overnight. Knead and soften fondant for the coffin. Roll the fondant. Texture the fondant with the wood grain texture mat. Brush piping gel on the coffin lid. Cover the lid with the textured fondant. Use the polyblade to trim around the fondant-covered coffin lid. Roll a strip of fondant. Texture with the wood grain texture mat. Cut the strip the height of the sides of the coffin cookie. Brush piping gel around the side of the cookie. Place the strip around the side of the coffin. Add additional dimension on the coffin lid and the side of the coffin using the polyblade to add deeper cuts. Add nail holes using the two in one tool. Cut small pieces to resemble wood pieces. Emboss “Keep Out” on the wood pieces using the letter embossers. Cut a small square of grey fondant and emboss “Open if you dare” using the letter embossers. Paint the square with silver dust mixed with grain alcohol. Mold the top part of the key using black fondant. Paint the key plaque with silver dust mixed with grain alcohol. Emboss “RIP” on the key plaque using the letter embossers. Mold the rose and attach using piping gel. Attach the coffin lid accents using piping gel. Pipe the stem using royal icing and tip #1.5. Pipe a spider web using black royal icing and tip #1.5.

Cover the mini cookies with rolled fondant. Emboss the hands using the two in one tool. Emboss the bat using a paring knife. Use non-pariels for the eyes on the bat, ghost, and crow, attaching with piping gel.

IMG_8002

IMG_8003

IMG_7999

IMG_8000

Paisley Bird Cookies

Paisley Bird Cookies

Paisley Bird Cookies

Supplies used:

5″ bird cookies
assorted colors rolled fondant
paisley texture mat
paisley accessory mold
royal icing
small round piping tips
piping gel
pastry brush
flexible polyblade
rolling pin
Autumn Carpenter’s Fluttering Friends Cutie Cupcake Cutter Set
assorted food color paste or gels

Instructions:

Roll fondant thin and use same cutter used to cut cookies to cut the fondant. Brush cookie with piping gel and attach fondant piece. To make texture piece, roll fondant thin and place over texture mat. Be sure the mat is on the side to give you a raised image. Roll over fondant with even pressure. Flip fondant over and remove mat. Use cutter to cut piece and attach to cookie using piping gel. Use polyblade to remove the beak and feet. Roll orange fondant the same thickness as your bird and use cutter to cut the feet and beak. Use the polyblade to cut feet, wing (only on the paisley textured birds) and beak and replace the feet and beak on the cookie.

For plain wings, roll desired fondant color thin and use the bird cutie cutter to cut the wing. Allow wing to dry for several hours. For paisley wings, push desired fondant color into paisley mold then remove with sharp pin or modeling tool. Pipe colored accents using royal icing then allow to dry for several hours.

Use royal icing to pipe over paisley textured birds and allow to dry. Attach wings to birds using piping gel and roll tiny balls from brown fondant for the eyes and attach with piping gel.

Mod Circle Baby Elephant Cookies

ModCircle Baby Elephant Cookies

ModCircle Baby Elephant Cookies


Supplies used:

white rolled fondant
lime green rolled fondant
orange rolled fondant
light blue rolled fondant
pale blue rolled fondant
Autumn Carpenter’s Mini Accent Cutter Set
Autumn Carpenter’s Jungle Cutie Cupcake Cutter Set
large round circle cutter
black non-pareils
piping gel
Mod Circle texture sheet

Instructions:

Roll white fondant to 1/4″ thickness, place fondant on Mod Circle texture sheet and roll with heavy pressure. Using the same cutter used to cut the cookies, cut out circles. Brush cookies with piping gel and lay on top of gel. Roll orange and lime green fondant very thin and cut small circles using mini accent cutter. Lay colored circles over the white circles of the cookie. Roll light blue fondant thin and cut elephant; apply to cookie with piping gel. Roll pale blue fondant very thin and cut using largest teardrop shape from accent cutter set. Apply to elephant with piping gel. Add black non-pareil for eye, attaching with piping gel.

Textured Flip Flop Cookies

Textured Flip Flop Cookies

Textured Flip Flop Cookies


Supplies used:

flip flop cookies
assorted colors of rolled fondant
Hawaiian Texture Sheet Set
piping gel
pastry brush
cotton balls
edible markers
PME strip cutter

Instructions:

Roll rolled fondant to desired thickness. Use texture mats to texture fondant and cut using same cutters used to make cookies. Brush cookies with piping gel and lay fondant on cookies. If pattern is recessed, used edible markers to highlight patterns. Cut flip flop straps using strip cutter. Attach to flip flop using piping gel. Use cotton balls to prop-up straps until dry.

3D Ladybug Cookies

3D Ladybug Cookies

3D Ladybug Cookies


Supplies used:

Autumn Carpenter’s Fluttering Friends Cutie Cupcake Cutter Set
Autumn Carpenter’s Mini Accent Cutter Set
red gum paste or rolled fondant
black gum paste or rolled fondant
piping gel
sharp paring knife or flexible poly blade
white non-pareils
2 ½” fluted round baked sugar cookies
grass tip
green buttercream icing
pastry bag

Instructions:

Roll gum paste or fondant very thin. If using a pasta machine, thin to a #3. Cut ladybugs out of both red and black gum paste or fondant. Use poly blade to cut between the head and body of both red and black pieces. Attach the black head to the red body using piping gel. Use the smallest circle accent cutter to cut black dots and attach to ladybug with piping gel. Place two dots of piping gel on the head and place white non-pareils for the eyes. Allow all pieces to harden overnite.
Using a pastry bag fitted with the grass tip, pipe grass on top of cookie. Be sure to make the grass a little thicker in the center. Slide hardened ladybug into the center of the cookie. If needed, pipe more grass in the back of the ladybug for support.

Baby Elephant Cookies

Baby Elephant Cookies

Baby Elephant Cookies


Supplies used:

Autumn Carpenter’s Jungle Cutie Cupcake Cutter Set
Autumn Carpenter’s Mini Accent Cutter Set
perfection strips
3 ¼” fluted square cookie cutter
lime green rolled fondant
turquoise rolled fondant
blue rolled fondant
light blue rolled fondant
black non-pareils
pastry brush
piping gel

Instructions:

Roll lime green fondant using black perfection strips. Cut fluted squares and attach to cookies brushed with piping gel.
Roll turquoise rolled fondant very thin and cut with elephant cutter. Attach to center of cookie with piping gel. Roll light blue fondant very thin, using the largest teardrop accent cutter, cut elephant ear and attach with piping gel. Place a dot of piping gel in front of the ear and push in a non-pareil for the eye.

Birthday Party Hat Cookies

Birthday Party Hat Cookies

Birthday Party Hat Cookies


Supplies used:

Autumn Carpenter’s Birthday Cutie Cupcake Cutter Set
white rolled fondant
light blue rolled fondant
dark pink rolled fondant
light pink rolled fondant
lime green rolled fondant
perfection strips
3 ½” round cookie cutter
2 ¾” fluted cookie cutter
sharp paring knife
flexible poly blade
piping gel
pastry brush
small paint brush

Instructions:

Roll light blue and white fondant using black perfection strips. Cut light blue fondant using the same cutter used to cut the cookies. Cut white fondant with fluted cutter and attach piece to cookie brushed with piping gel. Use fluted cutter to cut the center of the light blue circle and place around the edge of the white fluted piece; matching the cuts correctly.
Roll all colors of fondant very thin. Use party hat cutter to cut light pink, dark pink and lime green hats. Using poly blade, cut away hat brims and tops. Attach mismatched pieces to center of cookies using piping gel. Decorate hats using stripes cut from different colors or use tiny circle cutter to make contrasting color polka dots.

Graduation Cap Cookies

Graduation Cap Cookies

Graduation Cap Cookies

Supplies used:

Autumn Carpenter’s Graduation Cutie Cupcake Cutter Set
white rolled fondant
red rolled fondant
black rolled fondant
sharp paring knife
flexible poly blade
3 ½” fluted square cookie cutter
3 ¼” square cookie cutter
pastry brush
piping gel
tip #1
white royal icing
pastry bag
perfection strips

Instructions:

Roll black and white fondant using black perfection strips. Cut black fluted squares using the cutter used to bake cookies. Cut white squares with the 3 ¼” square cutter. Using the 3 ¼” square cutter, carefully cut the center of the black squares and removing the center piece. Brush the edges of the cut white squares with piping gel and lay the outer black fluted piece along the edge. Brush top of cookie with piping gel and lay attached piece on top of cookie.
Roll red fondant very thin. Cut two graduation caps. Attach one whole cap to the center of cookie with piping gel. Use poly blade to make a diagonal cut on the other cap to make just the mortar board. Attach mortar board to whole cap already on cookie with piping gel. Roll black fondant very thin and free-hand cut a tassle. Roll a tiny piece of black fondant into a ball and attach ball and tassle to top of cap.

Using a pastry bag fitted with tip #1 and filled with white royal icing, pipe the outer edge of the cookie.